Because I have a relatively short commute, and rarely anticipate needing my full 100% pack capacity, I have chosen to charge my truck to an 80% SOC on a daily basis to maximize battery life. One nice thing about the 80% level is that most batteries can be charged at a relatively high rate of speed up to 80%, and then you need to slow down the charging a bit to prevent them from overheating. (This is why DC Quick Chargers will quickly bring an empty battery up to 80%, but then slow down quite a bit after that.)
My first attempt at programming an 80% charging profile was very simple, just set MaxV to 128.5 and set the TermC (termination current) to 2 amps. This works well, it gets the pack voltage up to 128.5 volts and holds it there until the battery stops accepting much current. The only issue is that it is wasting time, because for a good amount of the charging period the current flowing into the battery is less than the maximum 30 amps (4.0 kW) that the chargers can produce. The charging curve looks like this, with a 3hr 20 min total time:
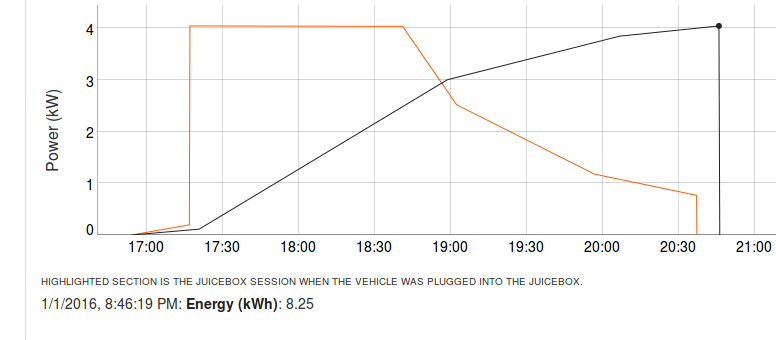
In an effort to speed up my charging, I set the MaxV to a higher amount ( 128.9 volts) so that at the 128 volt level the battery pack would still be accepting a higher current, and then set my TermC to the highest level my EVCC allows (10 amps). This results in a charging curve that looks like the following with a 2 hr 21 min time:

As you can see, I spend more time delivering 30 amps before the current draw from the pack starts to drop off, and the curve reaches the cutoff point much quicker. My EVCC currently limits the TermC parameter to 10 amps or less, probably because they have not anticipated somebody trying to charge only to 80% as quickly as possible. In both cases the battery pack resting voltage after the charging terminated was 128.1 volts.
If I could set the TermC parameter on my EVCC to 20 or 25 amps it would allow me to set the MaxV up higher (131?). The goal would be to find a voltage setting such that the pack would be drawing 20 or 25 amps right when it hit the 128.5 volt level. So my curve would basically be flat, full on charging at 30 amps up until the very end when it would start to taper off and the charging would end at 25 or 20 amps.
I’m not worried about setting the MaxV higher than the actual voltage I’m attempting to hit, as it is still much lower than my pack’s actual max voltage, and if something were to change with the pack chemistry making it miss the TermC cutoff, the MaxV would still stop the pack from reaching 100% charged. (and the termination timeout would eventually hit.)
This is the end of my main thought, but you can continue reading for…..
Extra Info about my pack, charging to the 80% level, etc…
The 48 modules from my Nissan Leaf battery pack (LMO/LNO chemistry) are arranged in a series of sixteen sets of 3 parallel cells. This gives me a 180Ah battery with an absolute maximum voltage of 134.4 (4.2 volts per cell). In actual use the 4.2 VPC level should never be reached, if you charge the cells to 4.1 volts per cell they are around 99% charged. As the extra 0.1 volt difference between 4.1 and 4.2 doesn’t really buy you much extra capacity, most people use 4.1 volts per cell (131.2 volts) as a safe “full” or 100% capacity on the Leaf Cells. My Mini-BMS units will start to shunt voltage at 4.1 VPC, and raise an over-voltage alarm at 4.2 VPC.
However, if you charge the cells to 4.0-4.01 VPC (128-128.5 volts) that corresponds to about 80% of their maximum possible capacity. To maximize cell and battery pack life, you want to minimize the time the cells are fully charged or fully discharged. If you can keep the cells between a 10%-80% state of charge (SOC) it will maximize their battery life.
Keeping them above 10% SOC is easy…don’t drive until they are empty. Keeping them at or below 80% SOC is also easy, simply turn off your charger when they are only 80% charged. This is why the early Nissan Leafs had the option to only charge the battery to 80%. (Removed in the newer Leafs due to EPA regulations on how maximum range is calculated.)
If you want the extra 20% of range that charging to 100% SOC would give you, it is better to charge to 100% and then immediately discharge the pack by driving it (as opposed to leaving it sitting at 100% charge all night). This is one reason why Nissan Leaf’s have a charge timer, so that you can tell the charger to finish just before you start your daily drive. (The other reason is so that you can tell it to start charging only after the low cost nighttime electricity rates start, if you are on a time of use metering rate plan.)
My 2nd charging profile will be a 4.1 VPC full 100% capacity charge, for when I feel the need to really go long distances. (or to get the pack ready for a top balancing equalization charge, my future 3rd charging profile.)